MD-Blog_Web Creative
第二回 Vue.jsでWebアプリをつくろう!

前回、Vue.jsのトリコになって、試しに時計アプリを作成してみましたが、二回目の今回はもう少し複雑なアプリを作りたいと思います。
作るのはiTunesのAPIを使ったiTunesSearchです!
実装ポイントはAPIとの通信による非同期処理とそれに伴うローディングの実装、親コンポーネントと子コンポーネントの連携方法などです。
開発環境構築
基本的な開発環境の構築は前回の記事を参考にしてください。
今回は axios というhttp通信を行う為のライブラリを使用するので、
コマンドプロンプト(ターミナル)に
npm install -S axios
と、入力してインストールしてください。
これで準備は完了です。
開発開始
前回同様、ファイルの整理から始めます。
- src/App.vue
を開いて
<template>


</template>


<script>


</script>


<style>


</style>
一旦、空にします。
続いて
- src/assets/logo.png
- src/components/HelloWorld.vue
を削除します。
最初に検索フォームをつくるため、
- src/components/Search.vue
を作成します。
まずは、script部分からです。
<script>
import axios from "axios";


export default {
  data() {
    return {
      term: "",
    }
  },
  methods: {
    async exe() {
      this.$emit("loadStart")
      const { data } = await axios.get(`//itunes.apple.com/search?term=${this.term}&country=jp&entity=musicVideo`);
      this.$emit("loadComplete", { results: data.results })
    },
  },
};
</script>
ポイント
- $emit
イベントを送出するもので、JavaScriptで例えるとdispatchEventだと思ってください。 - async/await
async/await自体はVue.jsとは関係ない機能ですが、非同期処理が非常に簡単に書けるので積極的に使用していきましょう。 - 取得したデータを$emitを通じて、親コンポーネントで受け取れるようにする。
続いて、template部分です。
<template>
  <div>
    <div class="container">
      <input class="text" type="text" v-model="term" @keyup.enter="exe">
      <input class="submit" type="submit" value="Search" @click="exe">
    </div>
  </div>
</template>
ポイント
- v-model
双方向データバインディングを行うもので、inputの値とdataの値が常に同期されます。 - v-on(@)
イベントを購読するもので、JavaScriptで例えるとaddEventListenerだと思ってください。 @はv-onの省略記法です。
また、装飾子も用意されていて
- @event.stop - stopPropagationを実行
- @event.prevent - preventDefaultを実行
- @event.once - イベントを一度だけ実行
- @event.{keyCode | keyAlias} - 指定したキーのみ実行
他にも色々用意されているので公式サイトでご確認ください。
最後に、style部分です。
<style scoped>
.container {
  display: flex;
  justify-content: center;
  height: 70px;
  padding: 20px;
  background-color: #35495e;
  box-sizing: border-box;
}


.text {
  width: 50%;
  max-width: 300px;
  padding: .5em;
  border: none;
}


.submit {
  padding: .5em 2em;
  margin-left: 10px;
  color: #fff;
  background-color: #42b883;
  border: none;
  border-radius: 20px;
}
</style>
続いてローディング画面のために
- src/components/Loading.vue
を作成します。
ここはCSSアニメーションでつくるので、templateとstyleだけです。
template部分
<template>
  <div>
    <div class="item"></div>
  </div>
</template>
style部分
<style scoped>
.item {
  width: 50px;
  height: 50px;
  position: absolute;
  top: 0;
  right: 0;
  bottom: 0;
  left: 0;
  margin: auto;
  border: 3px solid #42b883;
  border-top-color: transparent;
  border-radius: 50%;
  animation: spin 0.75s infinite linear;
}


.item::after {
  content: "";
  position: absolute;
  top: -3px;
  left: -3px;
  width: inherit;
  height: inherit;
  border: inherit;
  border-radius: inherit;
  transform: rotate(60deg);
}


@keyframes spin {
  from {
    transform: rotate(0deg);
  }
  to {
    transform: rotate(360deg);
  }
}
</style>
続いて検索結果を表示する
- src/components/Result.vue
を作成します。
まずは、script部分です。
<script>
import Loading from "@/components/Loading";


export default {
  props: ["items", "loadProgress"],
  components: {
    Loading,
  },
  methods: {
    getYear(dateStr) {
      const date = new Date(dateStr)
      return date.getFullYear()
    },
  },
};
</script>
ポイント
- 親コンポーネントからpropsでitemsとloadProgressを受け取る。
- Loadingコンポーネントを登録
- getYearメソッドで日付の文字列から年を取得
続いて、template部分です。
<template>
  <div>
    <ul class="list">
      <li class="item" v-for="item of items" :key="item.trackId">
        <div class="item-inner">
          <div class="photo">
            <img class="photo-img" :src="item.artworkUrl100" :alt=item.trackName>
          </div>
          <div class="content">
            <p><a class="track" :href="item.trackViewUrl" target="_blank">{{ item.trackName }}</a></p>
            <p><a class="artist" :href="item.artistViewUrl" target="_blank">{{ item.artistName }}</a></p>
            <div class="data"> {{ getYear(item.releaseDate) }} / {{ item.primaryGenreName }} / ¥{{ item.trackPrice }}</div>
          </div>
        </div>
      </li>
    </ul>
    <Loading class="loading" v-show="loadProgress"/>
  </div>
</template>
ポイント
v-for
反復処理を行います。
ここで言うと、親コンポーネントから送られてきたitemsの中身を繰り返しています。
また、key属性に一意な値を設定することが推奨されています。(:を使って動的に値を設定します)v-show
値の真偽に応じて表示・非表示を切り替えるものです。
ここでは、loadProgressの値に応じてLoadingコンポーネントの表示・非表示を切り替えています。
最後にstyleです。
<style scoped>
.item {
  padding: 20px 0;
}


.item:nth-of-type(even) {
  background-color: #f5f5f5;
}


.item-inner {
  display: flex;
  width: 90%;
  max-width: 600px;
  margin: auto;
}


.photo {
  flex: 0 0 150px;
}


.photo-img {
  width: 100%;
  display: block;
}


.content {
  flex: 1 1;
  padding-left: 20px;
}


.track {
  color: #42b883;
  font-size: 2rem;
  font-weight: 700;
  text-decoration: none;
}


.artist {
  display: block;
  color: #42b883;
  font-size: 1.4rem;
  font-weight: 700;
  text-decoration: none;
}


.data {
  margin-top: 1.5em;
  text-align: right;
  font-size: 1.2rem;
}


.loading {
  position: fixed;
  top: 70px;
  right: 0;
  bottom: 0;
  left: 0;
  z-index: 1;
  background: #35495e;
}
</style>
最後に今までにつくったコンポーネントを画面に表示させるために
- src/App.vue
を編集していきます。
まずは、scriptです。
<script>
import Search from "@/components/Search";
import Result from "@/components/Result";


export default {
  data() {
    return {
      items: [],
      loadProgress: false,
    };
  },
  methods: {
    onLoadStart() {
      this.loadProgress = true;
    },
    onLoadComplete({ results }) {
      this.items = results;
      this.loadProgress = false;
    },
  },
  components: {
    Search,
    Result,
  },
};
</script>
ポイント
- Searchコンポーネント、Resultコンポーネントを登録
- loadStart/loadCompleteイベント時に実行するイベントハンドラを作成
- dataのitemsにはAPIから取得したデータを入れる
- loadProgressにはローディングの状態が入る
続いてtemplateです。
<template>
  <div class="root">
    <Search class="search" @loadStart="onLoadStart" @loadComplete="onLoadComplete"/>
    <Result :items="items" :loadProgress="loadProgress"/>
  </div>
</template>
ポイント
- SearchコンポーネントからloadStart/loadCompleteイベントを購読する
- ResultコンポーネントにitemsとloadProgressを送る
最後にstyleです。
<style scoped>
.root {
  padding-top: 70px;
}


.search {
  width: 100%;
  position: fixed;
  top: 0;
  left: 0;
  z-index: 1;
}
</style>


<style>
html {
  font-size: 62.5%;
}


body {
  margin: 0;
  color: #35495e;
}


p {
  margin: 0;
}


ul {
  padding: 0;
  margin: 0;
}
</style>
前回同様、ページ全体に適用させるstyleも定義します。
これで↓のような画面が表示されるはずです。
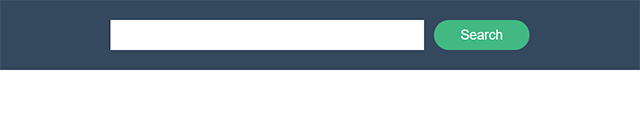
テキストエリアに何か入力してEnterキーを押すか、Searchボタンをクリックしてください。

このように検索結果が表示されれば成功です!
まとめ
前回と比べて少し複雑だったと思いますが、素のJavaScriptで作るより断然簡単だったのではないでしょうか?
次回は Vue Router を使ったルーティング機能をご紹介したいと思います!

- Recent Entries
-
- WEBプロダクション事業部のAI推進はこうして動き出した
- ライブ配信の音づくりが難しい理由。音響オペレーターが直面する「音の遅延」と「変わる音質」
- 職業病全開!UI/UXが気になって仕方ないWebディレクターが唸った「育児の神アプリ」3選
- ライブ配信のSW(スイッチャー)って何をする仕事? チームの技量を映像へと昇華させるSWのやりがい
- リモートワークもオフィスワークも経験したからこその選択
- 世界のすべてが「現場」に見える!? 新卒2年目アシスタントのリアルな職業病レポート
- 47歳、4度目の転職してみた 〜異色キャリアを「スキルの掛け算」でWEB業界の武器にする〜
- 中途1年目ディレクターがイベント現場で初見すぎて戸惑った「呪文」3選
- MONSTERDIVEをもっと知ってもらいたい!社内活動のいろいろ
- 「無形」を「ブランド」に。WEBディレクターの見えないモノづくり
- MD EVENT REPORT
-
- よりよいモノづくりは、よい仲間づくりから 「チームアクティビティ支援制度」2025年活動報告!
- MDの新年はここから。毎年恒例の新年のご祈祷と集合写真
- 2024年もMONSTER DIVE社内勉強会を大公開!
- 社員旅行の計画は「コンセプト」と「事前準備」が重要! 幹事さん必見! MONSTER DIVEの社内イベント事例
- 5年ぶりの開催! MONSTER DIVE社員旅行2024 "Build Our Team"!
- よいモノづくりは、よい仲間づくりから 「チームアクティビティ支援制度」2023年活動報告!
- 2023年のMONSTER DIVE勉強会を大公開!
- リフレッシュ休暇の過ごし方
- 勤続10周年リフレッシュ25連休で、思考をコンマリしたりタイに行った話。
- 俺たちのフジロック2022(初心者だらけの富士山登山)
- What's Hot?
-
- 柔軟に対応できるフロントエンド開発環境を構築する 2022
- 楽しくチームビルディング! 職場でおすすめのボードゲームを厳選紹介
- ライブ配信の現場で大活躍! 「プロンプター」とは?
- 名作ゲームに学べ! 伝わるUI/UXデザインのススメ
- 映像/動画ビギナーに捧げる。画面サイズの基本と名称。
- [2020最新版] Retinaでもボケない、綺麗なfaviconの作り方
- ビット(bit), バイト(Byte), パケット。ついでにbps。 〜後編「で、ビットとバイトって何が違うの?」〜
- 有名企業やブランドロゴに使われているフォントについて調べてみる。
- 算数ドリル ... 2点間の距離と角度
- 画面フロー/システムフローを考えよう!